
[ad_1]
The Windows 10 boot menu is a mix of old and new. After many users expressed their hatred for the Metro UI boot menu on Windows 8, Microsoft decided to fix the problem with Windows 10. Microsoft took some elements of Windows 7 and merged them with Windows 8 elements to create the Windows 10 boot menu.
It is surprisingly easy to navigate and customize, so much information will not be new. However, we hope to add some tips and tricks to give you even more customization options. Here's how to use the Windows 10 Start menu.
More articles on Windows 10 Tutorials!
The basics
You can do a number of small things in the Windows 10 Start menu. We will briefly list some of the simplest customization options below and we will move on to the more powerful part later in the article:
Change the size of the start menu – It's pretty easy. Move your mouse over the top edge of the start menu. Click and drag up to make it bigger or lower to make it shorter. The width is determined by the number of columns you have.
Enable full screen mode – Open the Windows 10 settings and select the Customization section. Click the Start option in the left margin. From there, there are a variety of minor customization options. Full screen mode is one of these options. Simply activate it in this menu.
Most-used apps, suggested apps, and recently added apps – All of these options allow you to add or subtract additional items from the Windows 10 Start menu. They are all in the same customization section as the full screen mode above. Simply enable or disable the buttons depending on the cleanliness or clutter of your boot menu.
Pin apps to the start menu – There are two methods for pinning applications in the start menu. The first one is to search for the application in the All applications menu, right-click on it and click on the "Pin to start" option. You can also drag applications from the All Apps list directly into the Start menu to create a new thumbnail on the Start menu. To reverse this process, right-click on a mosaic dataset and select the "Unpin from Start" option.
Enable and disable dynamic thumbnails – Just right-click on a thumbnail in the Start menu, select the "More" option, then select "Enable Dynamic Thumbnail" or "Disable Thumbnail". Please note that applications that do not have dynamic thumbnails do not have this option.
Move and resize tiles – This is another easy function. You can simply drag tiles where you want. To resize, right-click the thumbnail, select "Resize", and then select the desired size. Not all apps have access to all available tile sizes.
Change the accent color – Your accent color determines the color of the tiles. You can customize this by opening the Windows 10 settings, going to personalization, and then clicking on the "Color" option in the left margin. Scroll down the list and select your favorite color. You can also set it to automatically change the color according to the colors of your wallpaper.

Customize left margin icons with folders
The left margin of the Windows 10 Start menu contains some icons that allow you to perform different operations. This is the fastest way to access items such as settings, your account page, the power menu, and more. It is also fully customizable.
- Open the boot menu.
- Right click on any icon.
- Select the "Customize this list" option.
- You can also access this menu by opening the Settings, by going to Personalization, clicking on the "Start" option in the left margin, then clicking on the "Choose files to display at startup" option.
From there, select the desired icons on the left side. You can include various folders, the file browser, the Settings menu icon, your network settings and other personal folders. Close the window once you have selected everything you want to select.

Customize the list of all applications
The list of all applications is a static list of all your applications in alphabetical order. There is not much customization for this part of the Windows 10 Start Menu, as it is supposed to be some kind of static list that is easy to read. However, this does not mean that there is no way to customize it.
The only way to remove Universal Apps or applications installed from the Microsoft Store is to uninstall them. The method below works only with desktop applications that you install from outside the Microsoft Store. You can right-click any universal application and click the uninstall button option to remove it.
Here is the best way to customize the list of all applications:
- Right-click an application in the All Applications list. Select "More" and then "Open file location".
- A screen similar to the screenshot above will appear. These are all shortcuts for your All Apps list and you can do whatever you want here.
Change the names of applications and folders – You can right click on anything in this window and click on the "Rename" option to change the name. Any changes are reflected in the All Apps list. For example, you can rename Firefox to an FF browser and it will appear as an FF browser in your All Apps list.
Add / Remove applications from folders – Improve your organization by adding applications and games in various folders. Just right-click on the empty white space in the folder and click on the "Add New Folder" option to create folders. You can also delete applications from folders.
Remove and hide apps – You can delete icons at will. This removes them from the All Applications view but leaves them installed on your computer. For example, you can use this option to hide your kids' apps so they do not get in the wrong lane.
Please note that many things here require administrative privileges. In addition, universal applications like Calendar or Outlook do not display here and you can not customize them.

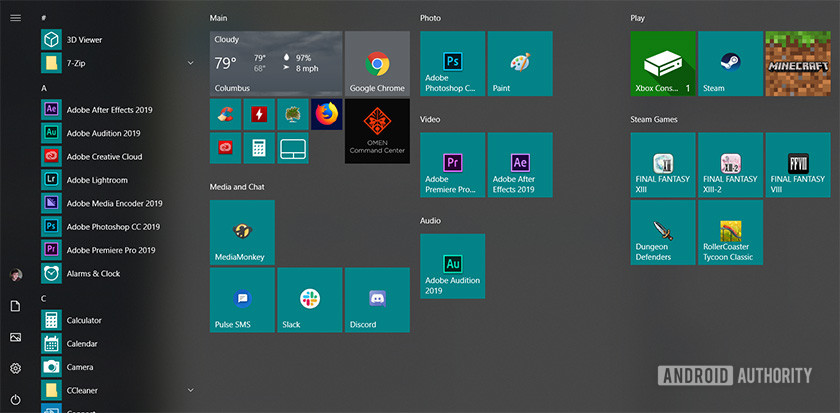
How to create and customize groups of tiles
The Windows 10 Start menu lets you organize your tiles into specific groups. You can group them as you wish, name the groups, and add and subtract tiles from the group.
Create a new group – Click and drag a tile to the Start menu section where you want your group. You should see a translucent bar appear similar to the screen capture above. Drop the application near this bar to create a new group. The bar will be the same color as your accent color.
Add tiles to any group of tiles – Click and drag the other tiles into the group by placing them next to the other apps in the group.
Rename tile groups – The groups of tiles have a space pronounced between them vertically. Click in this space to create a name for this group.
Move entire tile groups – Finally, you can move entire tile groups as needed. Just move your mouse cursor over the name of the group. You should see a two-line icon appear to the right of the group name. Click and drag this two-line icon to move the entire group with all the tiles in that group.
Tile groups are useful for many things. You can organize similar apps together for easy access. In addition, you can configure groups as you want so that yours are different from those of others. Use the tips above to make yours!

Other tips and tricks
The boot menu of Windows 10 is the most powerful boot menu of all versions of Windows. There are a lot of little tips, tricks and secret features available. We have as many as we could find just below. We also recommend using the right-click often in the Start menu because different tiles, applications and settings allow to display different menus with different functions.
Magnify the start menu – If the Start menu is a bit difficult to read for any reason, you can enlarge it with all other parts of the operating system. Just open Settings, go to System and press the "View" option in the left margin of the system settings. There is an option to change the magnification from 100% to 125%, 150% or 200%. This expands everything, including the boot menu.
Expand left margin icons – The top left corner of the Windows 10 Start menu has a three-line button. Click on it to expand the left margin to the outside, which makes it easier to read the options.
Uninstall applications quickly – You can right-click an application, desktop, or Universal, and then click the uninstall button. If it is a Microsoft Store application, it will simply be uninstalled immediately. Uninstalling a desktop application will immediately take you to Control Panel to uninstall it.
Recreate the classic boot menu – It's less a trick than an observation. You can make the Windows 10 Start menu look like Windows 7 by simply unchecking each tile. Only the list of all applications remains.
Add tiles to folders – Just like Android and iOS, you can move tiles one over the other to place them in a folder. You can move this folder as its own thumbnail and access the applications it contains inside by clicking on it. This is a great way to clean up a messy Windows 10 startup menu. You can name the folders by opening them, by clicking where you are prompted to name the folder, then typing the name. You can delete thumbnails from folders by clicking on them and dragging them outside the folder.
Additional context menu – You can right-click the Windows 10 Start Menu button to display a large pop-up menu containing some basic functions, such as Powershell's Command Prompt, , network connections, applications and features, etc.
Change the background color – This is a niche setting and it looks pretty bad with most colors. You can still do it. Go to Settings, then Personalization, and click on the "Colors" option in the left margin. Scroll to the place where it says "Show accent color on the following surfaces" and check the box corresponding to the Start menu option. You can also enable transparency effects in this menu, which also affects the Start menu.

Have we forgotten some great tips and tricks in the Windows 10 start menu? Tell us about it in the comments!
[ad_2]
Source link