[ad_1]
Today, we are talking about how you can reduce the CPU temperature in your laptop for free. No problem, risk or other cheating. Sounds good?
So, we are mainly interested in lowering the maximum temperature of our processor in load (high load) .
In this guide, I will refer to Intel-based laptops using the Intel XTU program. The Intel Extreme Tuning Utility program supports different processors, you can try if your processor is supported, or you can check the official list here
How can we speed up the processor of the laptop
We do it by a procedure called Undervolting . This procedure reduces the excess voltage that the processor receives with a program. This is a solution often used to process processors and often more efficient than any heat transfer paste or coolant pad.
Some basic ideas to eliminate any questions you may have about the procedure This does NOT reduce performance, does not damage the processor and does not affect the manufacturer's warranty.
And if you exaggerate with this method described in this article? You will get a blue screen. Upon restarting, everything returns to normal and the values set too low return to the factory default setting. There are no other repercussions or problems
Why do not you sub-empty
Because it involves no risk, it is free and you improve your experience with your laptop. Plus, it does not involve working with a screwdriver or anything else if you have your laptop under warranty or if you are … weird to enter.
Here is a list of advantages and disadvantages if you are easier:
Advantages:
- Cold processor (I've seen more temperatures low with 3 to 18 degrees Celsius)
- Performance increase If before the undervoltage you hit the thermal regulation (19659015) Less noise (since the processor is colder, the fans do not start so often or do not run faster (19459007) so long)
- Prolong the life of laptops: the components of laptops will be less stressed by the temperatures, less wear. In case of good negative results, we reduce the wear and wear of the fans
- More batteries – we may wonder what will be the extent of improvements, but after a short test, we still have 17 minutes of watching wireless clips
- : On a laptop equipped with a 4720HQ processor, the load has significantly reduced keyboard temperature in games. It's more comfortable to play without getting your fingers burned on WASD
Disadvantages:
If you cut too much tension, you risk having a blue screen error. Upon reboot, the laptop returns to the standard settings and you can retry with a more stable value.
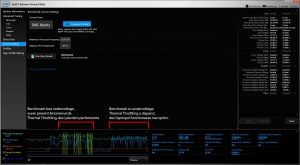
Here is a concrete example on an i7-6700HQ that often reaches the effect of thermal limitation, by default performance drops a 5 minute benchmark would seem to have an effect in 40mins gaming sessions, intervening already in FPS)
Why does this method work?
Due to the fact that processors are mass produced, small variations in the image quality of the actual product and implicitly in the final product may occur. To make sure that any new processor is out of the production line, the manufacturer by default uses a voltage that ensures the perfect operation of any chip.
But most faces can work regularly at a lower voltage. By default, power consumption and processor temperature decrease. It is there that the test part of the guide intervenes: it is quite possible that two identical processors as a model can achieve different performances underperforming
A method similar to the process that we will present is used from the beginning to modern processors: in real-time frequency and voltaje to meet the performance requirements at some point by the processor
Undervolting Guide
Let's start with the guide itself. Be patient and be ready to test more values until you find the ideal for your laptop processor [19659902] What you need to do this operation:
- a laptop with a charged battery
- Intel Extreme Tuning Utility (download it from here)
- OCCT program to make sure you have a stable result
- Cinebench R15 Program to ensure a stable result
- Forgiveness. After each adjustment of the values, we must test the stability of the processor in the applications we use in the usual way and in programs designed to solicit the processor
-
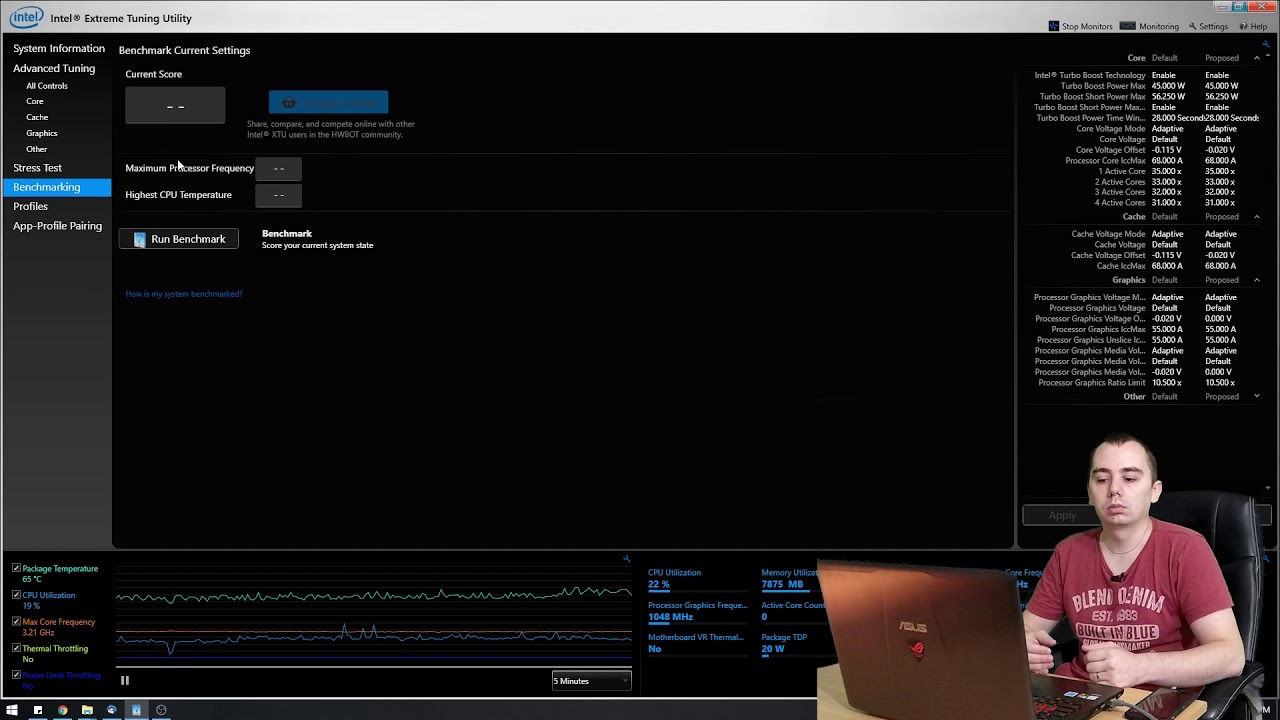
Download and install XTU (Intel Extreme Tuning Utility) [19659035] XTU program, install it and start it. We will be greeted by the startup screen of the application that looks like this:
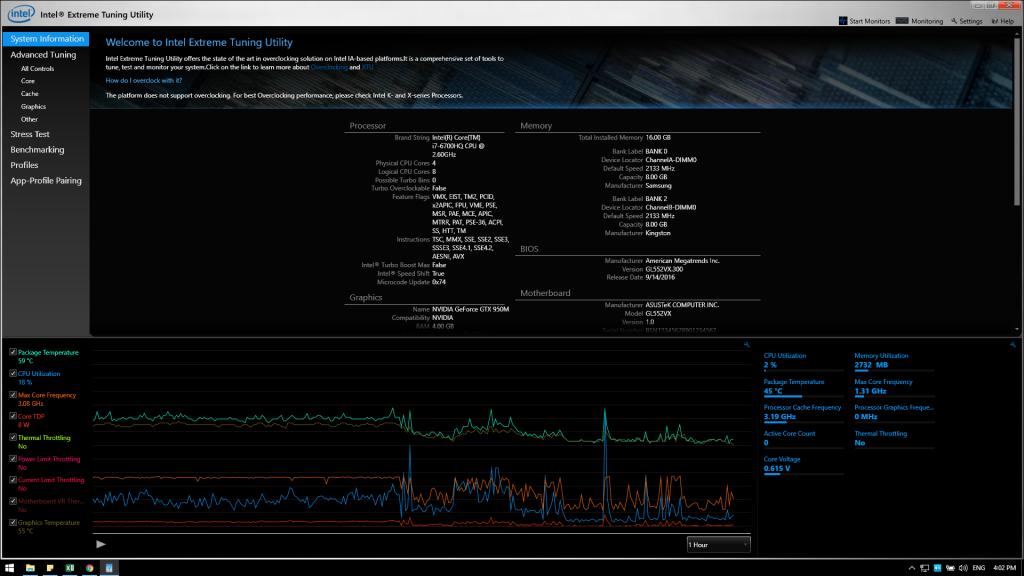
On the left we have a menu with sections of the program. In the center, we have system data. At the bottom, we have a monitoring table gathering some useful data about the system and the processor in real time.
2. Let's get to work
First of all, I recommend you to note the maximum and average temperatures of your processor when running games and applications that you normally use.
Here we adjust the value of & # 39; Core Voltage & # 39;
<img class = "td-modal-image aligncenter wp-image-1634 size-large" src = "https://petech.ro/wp-content/uploads/2017/07/right-laptop-prin- undervolt-2-1024×576.png "alt =" In the menu on the left, we choose from among "Advanced Tuning" Offset.If your values are standard, they will all be in blue.When you change something, this is parameter becomes yellow.
a. We click on 0.000 V from "Core Voltage Offset"
b. We reduce the value. This can be reduced with voltages at 0.005v intervals Since we aim to reduce voltaje and improve temperatures, we choose a negative value.
v. We start slowly: I recommend you start with increments of -0.010 v. So you choose the value -0.010v from the "Core Voltage Offset" and press Apply.
d. Nou We test the system in several programs to make sure the new value is stable. I recommend you do not skip over this step, to make sure that you can continue to reduce the value of the Core Voltage Offset & # 39 ;. I have a habit of testing: minimum 30min in the XTU stress test, minimum 30min in OCCT, one hour in a game that plays often and video rendering in After Effects. You can choose your favorite programs / games but I recommend you do not jump over the Stress Test and OCCT.
If all is well and we have not received a blue screen, we continue to reduce -0.010v. We do this until we reach the temperatures we are thankful for or error (in this case, after rebooting, we set a higher value in XTU and re-test)
And so, until we reach
If you have constantly monitored the temperatures in all programs / tests along the adjustments (as you recommend), you can compare the temperatures before and after the undervoltage. We should notice much smaller programs or intensive games.
3. Why are we just going to Core Voltage Offset?
To take advantage of processor technology to adjust voltages and frequencies in real time, it is worthwhile to walk at this value. – it is automatically synchronized with the cache voltage offset, and it is normal for both parameters to have identical values
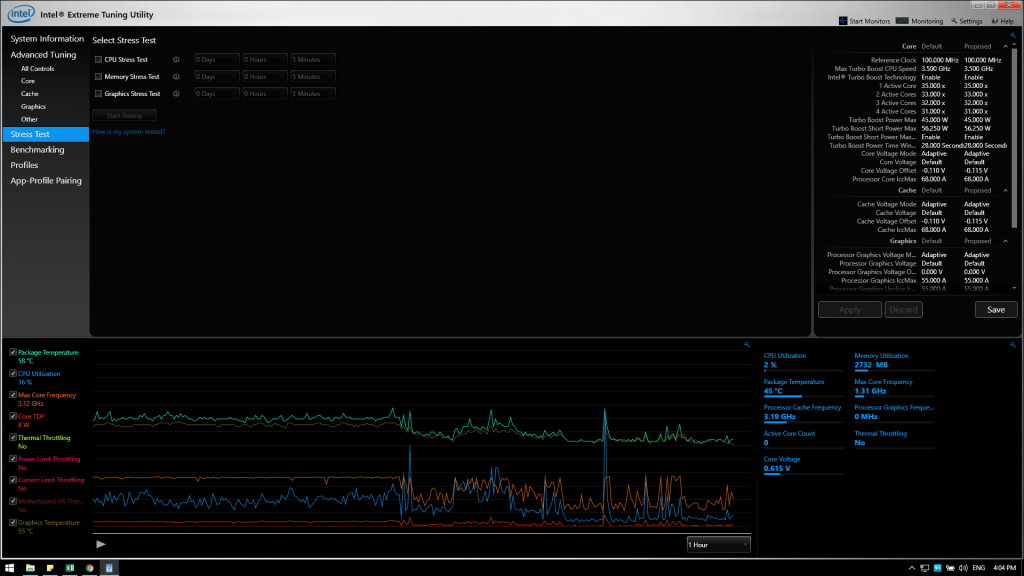
4. Further details on the XTU program
Also in the Intel Extras Tuning Utility, we have a menu where we can stress the laptop to see its stability
save various general profiles with our parameters or individual profiles by application. A very useful function if you sit down and play more with the undervoltage. For example, the 4720HQ processor is perfectly stable with -0.110v rendering in After Effects, but also clutches in games and OCCT (bluescreen). So, I use the application profiles to get lower temperatures when I leave the laptop on rendering. Then temperatures get a bigger idea when I need 100% stability in any application. I've tested on two laptops with different processors: Intel (IEEE 802.11g) Core i7 6700HQ and Intel Core i7 4720HQ. Laptops have been running for over three months with these settings and the results are very good and welcome. Offset of the core voltage: -0.130v
- Cinebench R15 temperatures before and after: 83 degrees / 75 degrees
- OCCT 1h temperatures: 97 degrees / 86 19659018] Maximum Temperatures Youtube FullHD 30min: 61 Degrees / 58 Degrees DC Undervoltage 2017: 89 Degrees / 81 Intel Core i7 4720HQ (Laptop: ROG G771JW) :
- Core Core i7 4720HQ
- Offset of the basic voltage: Cinebench R15 temperatures before and after: 88 degrees / 84 degrees [19659017] Temperatures OCCT 1h: 91 degrees / 84 Rendering of Axime 1 in After Effects CC 2017: 89 degrees / 81 degrees;
- YouTube video clip Maximum FullHD 30min: 67 degrees / 61 grades; they were manufactured in a 26 degree room and the laptops rolled without buffer cooler along the tests (I looked at the OCCT and I went like that).
An improvement can be seen at both processors. 6700HQ has reached better temperatures with a lot, but with 4720HQ we can not complain. One very cool thing about the 4720HQ is that the thermal throttling process has disappeared from one of the games we tested.
Underestimated conclusions
So we managed to drastically improve the temperatures in the load of the FPS (more than 3 hours we did not play, but before the undervoltage after about 20 minutes) of both processors, with zero lei. I say that this method is a success. If I take into account that the procedure above has helped more CPU cooling than a cooler on my laptop model, it's already fantastic.
I invite you to try this method if you have problems with the CPU temperature. Tell me what results you have – I 'm even worried about it and I think that would help a lot.
If this guide / tutorial has helped you, give a sharing or send it to a friend with a laptop. Maybe it'll help! Do not forget to subscribe to YouTube's YouTube channel to find the first of these videos
- Core Core i7 4720HQ
Source link
