[ad_1]

Squint is right, and you will notice the majority of the named areas collecting the map in Call of Duty: The Blackout Mode of Black Ops 4 is a re-enactment of some of the most popular multiplayer and zombie cards from Treyarch's CoD games. The abundance of loot is as generous as the iconic fast movement of Call of Duty observed by our resident BR players – so picking places where to launch as a tactical sugar glider is not a decision as difficult as PUBG's party or famine venues. However, some spots stand above others for their premiums or reliable location for a less intense drop. Here are some of the areas of choice to start a blackout to the right of the round.
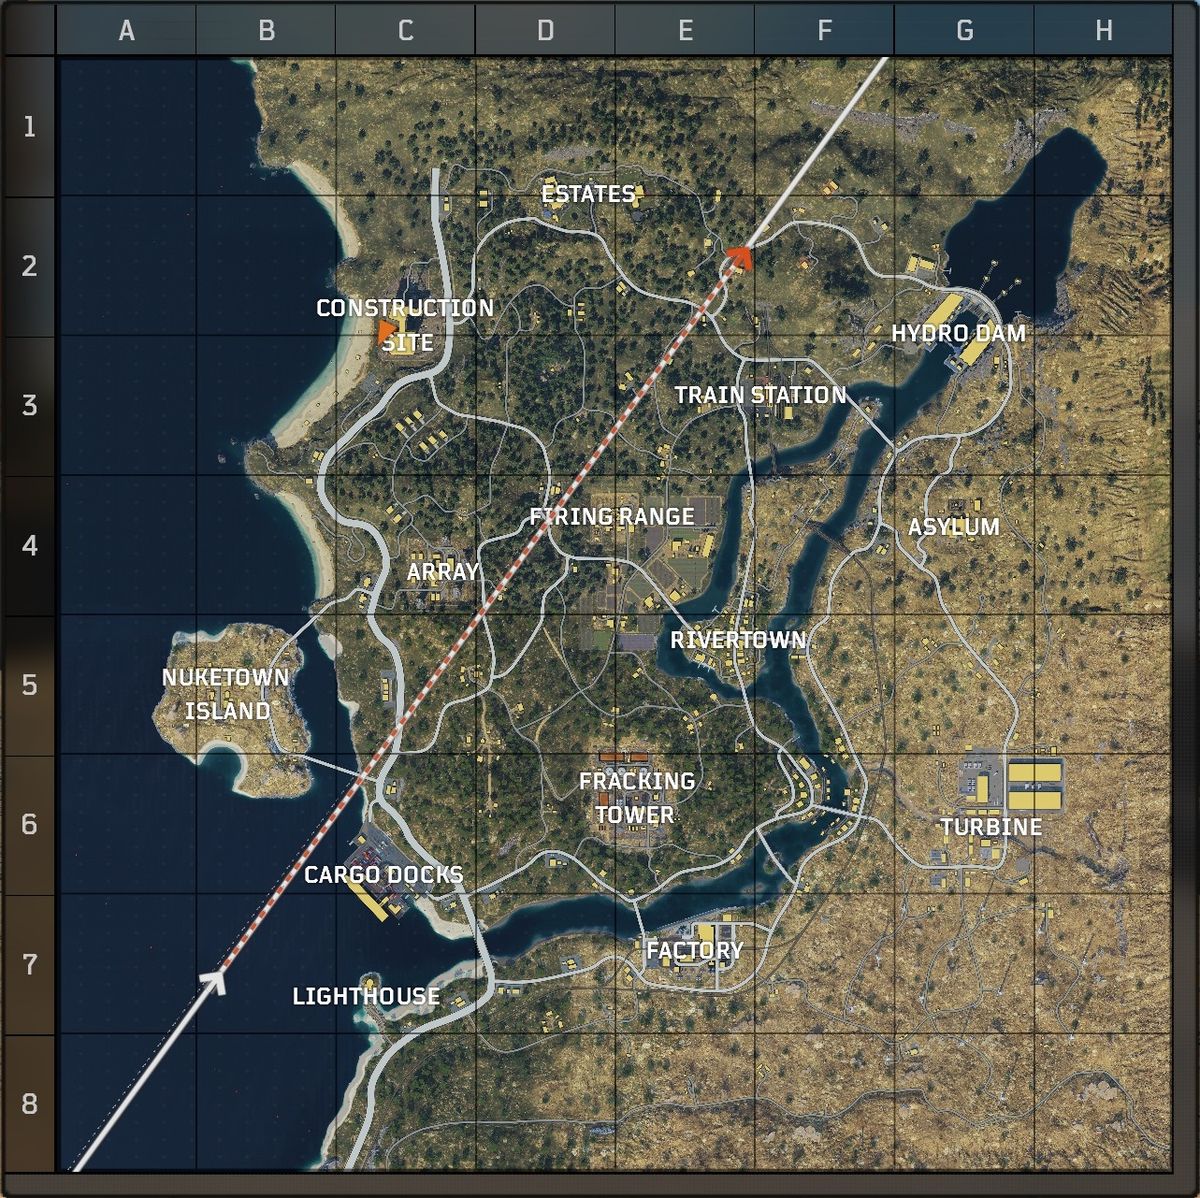
1. Nuketown Island (B5)
The T-shaped avenue of the ruined houses that line the island's surface on the western edge of the Blackout map is home to many weapons and armor, so expect close action if you choose to land here . The true price of the island lies underground: a vast bunker complex accessible by concrete hatches dotting the surface (as at the end of the south road).
Coupled with the relative safety of the bunker's straight passages – just look ahead and behind you to find enemies – there is an increased likelihood of quality gear, such as the rarest gold weapon variant. Spend enough time exploring and you will often be able to leave the bunker as a BR god completely decked out during the early stages of a game. Be careful when leaving the island, as bridges in the northeast and southeast are usually guarded by snipers.
2. Asylum (G4)

Nothing shouts out, "Hey, take a look at the zombies we put in the blackout," like the Halloween postcard haven perched on top of the hills at the east end of the map. You are certain to wake up a horde of whistling whistlers as you walk the two floors of the building (you can see if a spot will have a ray of blue light in the distance) or face the labyrinthine yard hedge, so keep your ears sharp for the steps of the enemy players behind all the moans and moans.
You can acquire powerful weapons from the Black Ops Zombies series, including the Zweihander LMG and Monkey Bomb grenade. The zombies themselves have a chance to drop medical items and weapons (the kind you shoot), like the powerful Ray Gun – a shot from his barrel will shoot down or eliminate an unshielded player. The asylum can also generate a mystery box (usually located on the second floor) that can assign a handful of consumables or gold variants.
3. Lighthouse (C7)
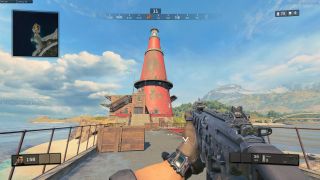
The Lighthouse, an unlabeled landmark that Treyarch has updated with a legend shortly after the release of the beta, is located only south of the map. The landing here represents a strategy of unhurried gear recovery, as few players prefer the long journeys necessary to catch up with the circle or find actions at the same time. Inland. As a result, your chances of fighting just after touching are low. Be sure to climb the tower to get a generally consistent level 3 armor near the top. An ATV will often appear near the end of the lighthouse crossing.
4. Fracturing tower (E6)

Check your confidence because the Fracking Tower is easily one of the busiest hot spots on the map. Its location, just south of the center of the map, makes it an excellent starting point for other nearby landmarks, and Tower Park offers piles of gear in its office buildings and containers. The ascent of the tower offers breathtaking views of the surrounding hills, but do not linger long at the risk of firing sniper fire. Measure these benefits against your skills for quick movement and pickup, as you will almost always arrive with a company of five or more people.
5. Neighborhood south of the yard (C3)
The unnamed areas scattered between the main points of interest of the map are often gold mines to catch a lot of gear with little confrontation. One such place is the sextet of modern houses just south of the yard. Each house is a mine of high-level armored and passive consumables, and the famous Koshka sniper rifle makes its appearance here. If you are hunted, it is easy to melt in the tree line in the southeast or to go down to the beach to break the sightlines. You are also in a privileged position to ambush travelers heading north from Array Island or Nuketown Island, or try a stroke of luck on the construction site.
6. Buildings of Control Center West of Hydroelectric Dam (G2)

An excellent place to acclimatize to your first laps, the two large office buildings west of Hydro Dam accommodate quantities of equipment, rifles, grenades, medications and few players due to proximity from the menu. You will find weapons on the second floor of each office, including the Rampart-17 and ICR-7 assault rifles. Since the hydro dam will probably have been looted by the time you finish the office, try to go over the houses along the road heading west. If you are looking to kill, head southwest to the train station.
Source link
